Difference between revisions of "Students/KristenZwicker"
| (13 intermediate revisions by the same user not shown) | |||
| Line 33: | Line 33: | ||
| − | Midterm Project | + | Midterm Project: |
| − | I | + | For my midterm project, I installed a speaker box that tells a narrative based on the song “Mary Had A Little Lamb” in a jacket. I removed the apparatus from a book with a little stuffed lamb that read the story aloud. Originally, a magnet embedded in one of the lamb’s feet was used to close the circuit, which was embedded in another foot, and ultimately trigger the speaker. I simply cut both of the wires, removing the magnetic component, and attached one wire to each half of the button enclosure on the front pocket of the jacket. . So, when the pocket is closed, the circuit is closed also, prompting the speaker to tell the story. In hindsight, I could have kept the magnetic component, attaching it to one half of the button, but alas, this occurred to me all too late. |
| − | + | The jacket, appropriately, is lined with a material that simulates sheepskin. If possible, I would have preferred to use a piece of clothing that incorporated actual sheepskin, or wool. Ideally, I would have loved to use a pair of Ugg boots. Unfortunately I do not own any such items. Aesthetically, however, I feel that this jacket makes the proper point. It puts a new spin on the words, “Mary had a little lamb, whose fleece was white as snow. And everywhere that Mary went, the lamb was sure to go.” | |
| + | |||
| − | [[Image: Circuit | + | [[Image: Midterm circuit2.jpg]] |
| + | |||
| + | [[Image: Midterm jacket.jpg]] | ||
| + | |||
| + | [[Image: Midterm wiring1.jpg]] | ||
| + | |||
| + | [[Image: Midterm wiring2.jpg]] | ||
| + | |||
| + | |||
| + | |||
| + | |||
| + | |||
| + | Final Project Proposal | ||
| + | |||
| + | In lieu of the recent budget cuts, I would like to comment on the rising cost of education. To do this, I would like to install a speaker in a textbook that will emit an S.O.S. signal, signifying the distress that public education is currently in. This will require wiring up a speaker to one of the digital out pins on the Arduino. Musical notes can be specified with code. I will hollow out a portion of the inside of the textbook to house the electronic components and somehow install a switch on the outside of the book to trigger the sound. | ||
| + | |||
| + | |||
| + | Final Project Write-Up | ||
| + | |||
| + | In lieu of the recent budget cuts and increase in tuition costs, I've decided to comment on the current peril of public higher education. I've installed a speaker in a textbook and programmed my Arduino to perform an S.O.S. signal a number of times, which turns into the sound of a cardiac monitor, followed by a simple rendition of the Funeral March. | ||
| + | |||
| + | [[Image: Book.jpg]] | ||
| + | |||
| + | [[Image: Bookswitch.jpg]] | ||
| + | |||
| + | [[Image: Openbook.jpg]] | ||
| + | |||
| + | [[Image: Bookpage.jpg]] | ||
| + | |||
| + | The Circuit: | ||
| + | |||
| + | [[Image: CIRCUIT_500A.jpg]] | ||
| + | |||
| + | The Code: | ||
| + | |||
| + | #include "pitches.h" | ||
| + | |||
| + | // notes | ||
| + | int SOS[] = { | ||
| + | NOTE_A4,NOTE_A4,NOTE_A4,NOTE_A4,NOTE_A4,NOTE_A4,NOTE_A4,NOTE_A4,NOTE_A4,NOTE_0 }; | ||
| + | |||
| + | // note durations: 4 = quarter note, 8 = eighth note, etc.: | ||
| + | int toneDurations[] = { | ||
| + | 4,4,4,2,2,2,4,4,4,4 }; | ||
| + | |||
| + | int cardiacBeep[] = { | ||
| + | NOTE_A4,NOTE_A4,NOTE_A4,NOTE_A4,NOTE_A4 }; | ||
| + | |||
| + | int cardiacBeepDurations[] = { | ||
| + | 4,4,4,4,4 }; | ||
| + | |||
| + | int melody[] = { | ||
| + | NOTE_A4,NOTE_A4,NOTE_A4,NOTE_A4,NOTE_C5,NOTE_B4,NOTE_B4,NOTE_A4,NOTE_A4,NOTE_A4,NOTE_A4}; | ||
| + | |||
| + | int noteDurations[] = { | ||
| + | 2, 2, 4, 1,2,4,2,4,2,4,1 }; | ||
| + | |||
| + | void setup() { | ||
| + | |||
| + | //run SOS 3 times | ||
| + | for (int runSOS = 0; runSOS < 3; runSOS++) { | ||
| + | |||
| + | // SOS | ||
| + | for (int thisTone = 0; thisTone < 10; thisTone++) { | ||
| + | |||
| + | // to calculate the tone duration, take one second, divided by note type | ||
| + | int toneDuration = 1000/toneDurations[thisTone]; | ||
| + | // call tone | ||
| + | tone(8,SOS[thisTone],toneDuration); | ||
| + | // silence to distinguish between notes | ||
| + | int pauseBetweenTones = toneDuration*2; | ||
| + | delay(pauseBetweenTones); | ||
| + | } | ||
| + | } | ||
| + | |||
| + | // begin cardiac beep | ||
| + | for (int thisCardiacBeep = 0; thisCardiacBeep < 5; thisCardiacBeep++) { | ||
| + | |||
| + | int cardiacBeepDuration = 1000/cardiacBeepDurations[thisCardiacBeep]; | ||
| + | tone(8,cardiacBeep[thisCardiacBeep],cardiacBeepDuration); | ||
| + | int pauseBetweenBeeps = cardiacBeepDuration*5.3; | ||
| + | delay(pauseBetweenBeeps); | ||
| + | } | ||
| + | // cardiac arrest | ||
| + | tone(8,NOTE_A4,5000); | ||
| + | |||
| + | // pause before funeral march | ||
| + | delay(6000); | ||
| + | |||
| + | // begin Funeral March | ||
| + | for (int thisNote = 0; thisNote < 11; thisNote++) { | ||
| + | |||
| + | int noteDuration = 1000/noteDurations[thisNote]; | ||
| + | tone(8,melody[thisNote],noteDuration); | ||
| + | int pauseBetweenNotes = noteDuration*1.1; | ||
| + | delay(pauseBetweenNotes); | ||
| + | } | ||
| + | } | ||
| + | |||
| + | void loop() { | ||
| + | // no need to repeat the melody. | ||
| + | } | ||
| + | |||
| + | Include this on a second tab within the Arduino sketch: | ||
| + | |||
| + | #define NOTE_0 0 | ||
| + | #define NOTE_B0 31 | ||
| + | #define NOTE_C1 33 | ||
| + | #define NOTE_CS1 35 | ||
| + | #define NOTE_D1 37 | ||
| + | #define NOTE_DS1 39 | ||
| + | #define NOTE_E1 41 | ||
| + | #define NOTE_F1 44 | ||
| + | #define NOTE_FS1 46 | ||
| + | #define NOTE_G1 49 | ||
| + | #define NOTE_GS1 52 | ||
| + | #define NOTE_A1 55 | ||
| + | #define NOTE_AS1 58 | ||
| + | #define NOTE_B1 62 | ||
| + | #define NOTE_C2 65 | ||
| + | #define NOTE_CS2 69 | ||
| + | #define NOTE_D2 73 | ||
| + | #define NOTE_DS2 78 | ||
| + | #define NOTE_E2 82 | ||
| + | #define NOTE_F2 87 | ||
| + | #define NOTE_FS2 93 | ||
| + | #define NOTE_G2 98 | ||
| + | #define NOTE_GS2 104 | ||
| + | #define NOTE_A2 110 | ||
| + | #define NOTE_AS2 117 | ||
| + | #define NOTE_B2 123 | ||
| + | #define NOTE_C3 131 | ||
| + | #define NOTE_CS3 139 | ||
| + | #define NOTE_D3 147 | ||
| + | #define NOTE_DS3 156 | ||
| + | #define NOTE_E3 165 | ||
| + | #define NOTE_F3 175 | ||
| + | #define NOTE_FS3 185 | ||
| + | #define NOTE_G3 196 | ||
| + | #define NOTE_GS3 208 | ||
| + | #define NOTE_A3 220 | ||
| + | #define NOTE_AS3 233 | ||
| + | #define NOTE_B3 247 | ||
| + | #define NOTE_C4 262 | ||
| + | #define NOTE_CS4 277 | ||
| + | #define NOTE_D4 294 | ||
| + | #define NOTE_DS4 311 | ||
| + | #define NOTE_E4 330 | ||
| + | #define NOTE_F4 349 | ||
| + | #define NOTE_FS4 370 | ||
| + | #define NOTE_G4 392 | ||
| + | #define NOTE_GS4 415 | ||
| + | #define NOTE_A4 440 | ||
| + | #define NOTE_AS4 466 | ||
| + | #define NOTE_B4 494 | ||
| + | #define NOTE_C5 523 | ||
| + | #define NOTE_CS5 554 | ||
| + | #define NOTE_D5 587 | ||
| + | #define NOTE_DS5 622 | ||
| + | #define NOTE_E5 659 | ||
| + | #define NOTE_F5 698 | ||
| + | #define NOTE_FS5 740 | ||
| + | #define NOTE_G5 784 | ||
| + | #define NOTE_GS5 831 | ||
| + | #define NOTE_A5 880 | ||
| + | #define NOTE_AS5 932 | ||
| + | #define NOTE_B5 988 | ||
| + | #define NOTE_C6 1047 | ||
| + | #define NOTE_CS6 1109 | ||
| + | #define NOTE_D6 1175 | ||
| + | #define NOTE_DS6 1245 | ||
| + | #define NOTE_E6 1319 | ||
| + | #define NOTE_F6 1397 | ||
| + | #define NOTE_FS6 1480 | ||
| + | #define NOTE_G6 1568 | ||
| + | #define NOTE_GS6 1661 | ||
| + | #define NOTE_A6 1760 | ||
| + | #define NOTE_AS6 1865 | ||
| + | #define NOTE_B6 1976 | ||
| + | #define NOTE_C7 2093 | ||
| + | #define NOTE_CS7 2217 | ||
| + | #define NOTE_D7 2349 | ||
| + | #define NOTE_DS7 2489 | ||
| + | #define NOTE_E7 2637 | ||
| + | #define NOTE_F7 2794 | ||
| + | #define NOTE_FS7 2960 | ||
| + | #define NOTE_G7 3136 | ||
| + | #define NOTE_GS7 3322 | ||
| + | #define NOTE_A7 3520 | ||
| + | #define NOTE_AS7 3729 | ||
| + | #define NOTE_B7 3951 | ||
| + | #define NOTE_C8 4186 | ||
| + | #define NOTE_CS8 4435 | ||
| + | #define NOTE_D8 4699 | ||
| + | #define NOTE_DS8 4978 | ||
| + | |||
| + | |||
| + | |||
| + | When I first wired the speaker up with the Arduino and the breadboard, the signal was very weak and produced a very quiet tone. I decided to add the TIP120 and the diode to increase the volume of the signal. I wanted to make the piece self-contained and not require a laptop for power, so I powered the Arduino with a 9V battery. In doing so, I discovered that my DC in on my Arduino didn't work, so I clipped a micro USB plug from and old cell phone charger and soldered it to the wires from the battery. I then cut out a section of a textbook to house the electronics. Finally, I added a push-to-break switch so that the program could be triggered without having to open the book. The switch shuts the Arduino off momentarily, causing it to restart the program. | ||
Latest revision as of 12:46, 16 March 2010
I am currently in my senior year at UCSD, majoring in ICAM Music. I originally got into the major thinking that it would provide me with a fair amount of sound engineering skills. By and large, it hasn't. However, I've managed to pick up some useful knowledge and along the way have been exposed to some very interesting art practices. It has definitely expanded my view of art, as well as the range of my own work. In this course I hope to explore circuit bending, though I am interested and excited to learn about manipulating electronic devices in general.
Midterm Project:
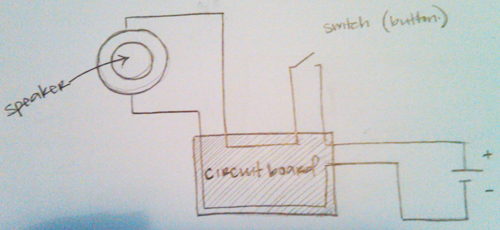
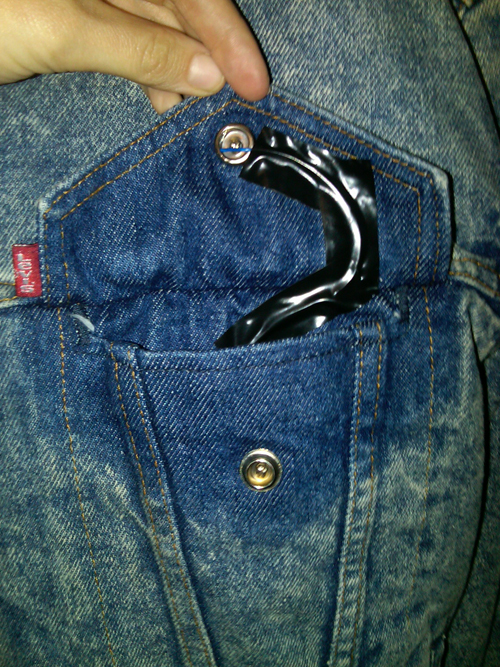
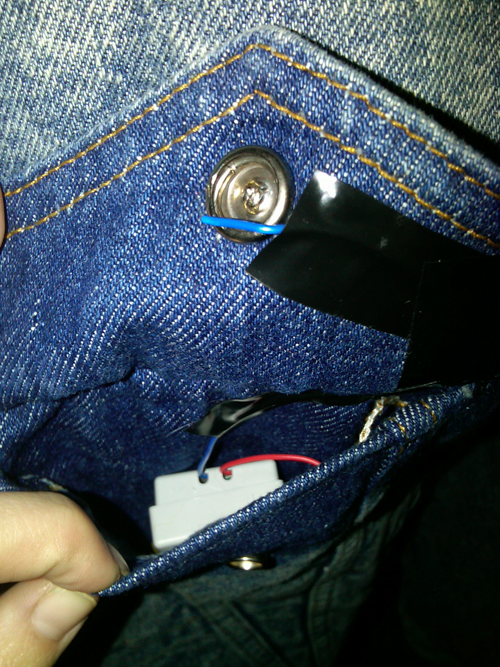
For my midterm project, I installed a speaker box that tells a narrative based on the song “Mary Had A Little Lamb” in a jacket. I removed the apparatus from a book with a little stuffed lamb that read the story aloud. Originally, a magnet embedded in one of the lamb’s feet was used to close the circuit, which was embedded in another foot, and ultimately trigger the speaker. I simply cut both of the wires, removing the magnetic component, and attached one wire to each half of the button enclosure on the front pocket of the jacket. . So, when the pocket is closed, the circuit is closed also, prompting the speaker to tell the story. In hindsight, I could have kept the magnetic component, attaching it to one half of the button, but alas, this occurred to me all too late.
The jacket, appropriately, is lined with a material that simulates sheepskin. If possible, I would have preferred to use a piece of clothing that incorporated actual sheepskin, or wool. Ideally, I would have loved to use a pair of Ugg boots. Unfortunately I do not own any such items. Aesthetically, however, I feel that this jacket makes the proper point. It puts a new spin on the words, “Mary had a little lamb, whose fleece was white as snow. And everywhere that Mary went, the lamb was sure to go.”
Final Project Proposal
In lieu of the recent budget cuts, I would like to comment on the rising cost of education. To do this, I would like to install a speaker in a textbook that will emit an S.O.S. signal, signifying the distress that public education is currently in. This will require wiring up a speaker to one of the digital out pins on the Arduino. Musical notes can be specified with code. I will hollow out a portion of the inside of the textbook to house the electronic components and somehow install a switch on the outside of the book to trigger the sound.
Final Project Write-Up
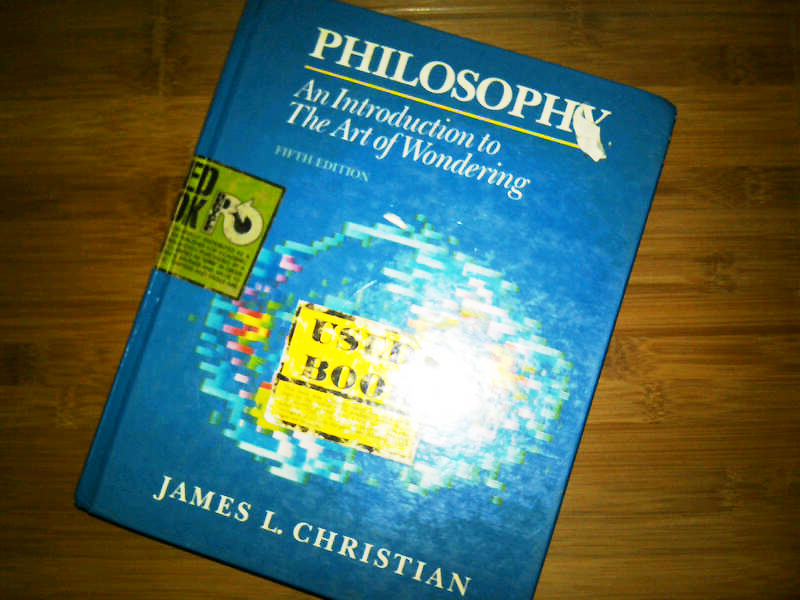
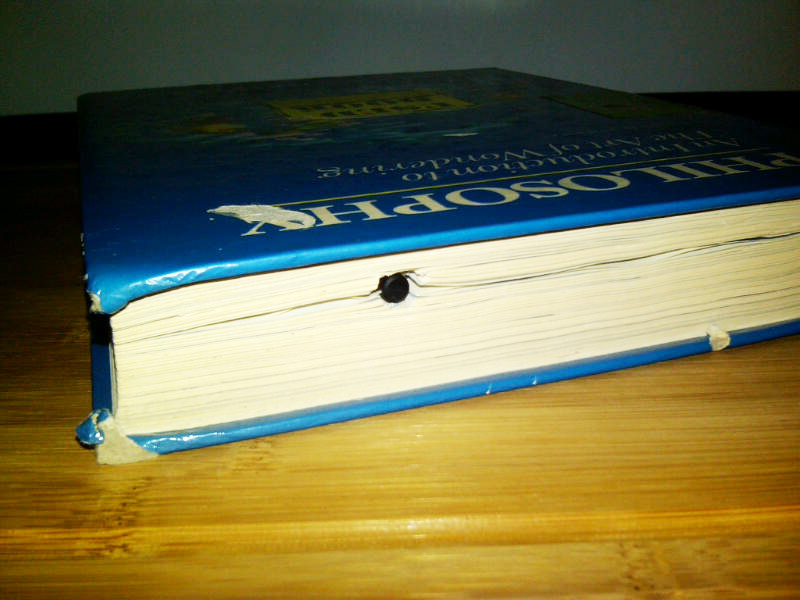
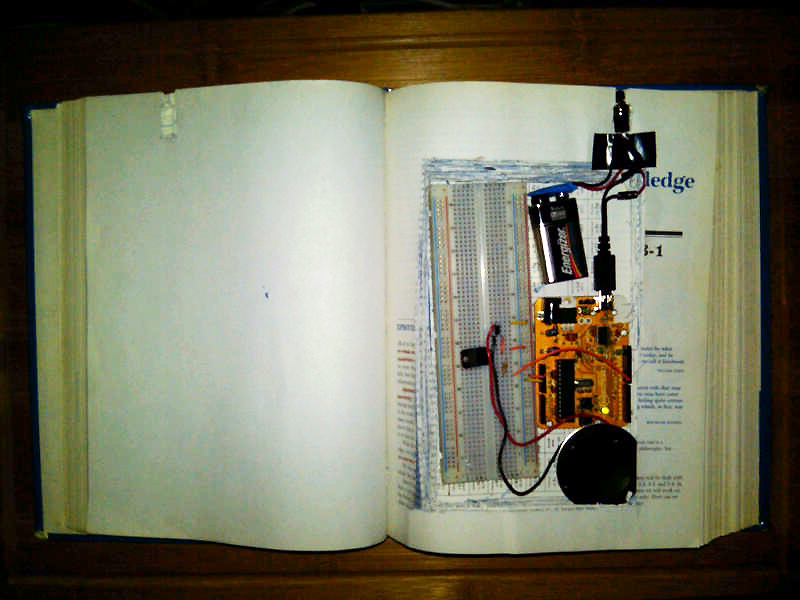
In lieu of the recent budget cuts and increase in tuition costs, I've decided to comment on the current peril of public higher education. I've installed a speaker in a textbook and programmed my Arduino to perform an S.O.S. signal a number of times, which turns into the sound of a cardiac monitor, followed by a simple rendition of the Funeral March.
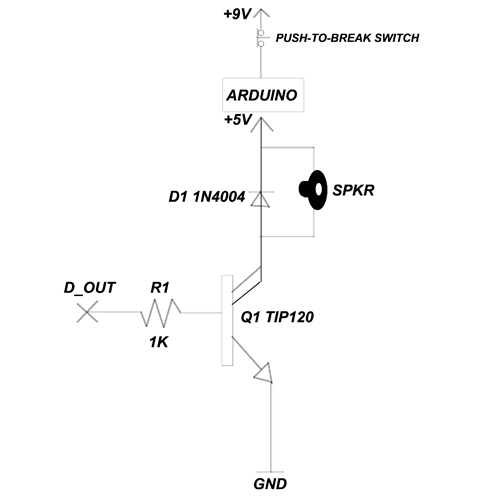
The Circuit:
The Code:
#include "pitches.h"
// notes
int SOS[] = {
  NOTE_A4,NOTE_A4,NOTE_A4,NOTE_A4,NOTE_A4,NOTE_A4,NOTE_A4,NOTE_A4,NOTE_A4,NOTE_0 };

// note durations: 4 = quarter note, 8 = eighth note, etc.:
int toneDurations[] = {
  4,4,4,2,2,2,4,4,4,4 };

int cardiacBeep[] = {
  NOTE_A4,NOTE_A4,NOTE_A4,NOTE_A4,NOTE_A4 };

int cardiacBeepDurations[] = {
  4,4,4,4,4 };
int melody[] = {
 NOTE_A4,NOTE_A4,NOTE_A4,NOTE_A4,NOTE_C5,NOTE_B4,NOTE_B4,NOTE_A4,NOTE_A4,NOTE_A4,NOTE_A4};
int noteDurations[] = {
 2, 2, 4, 1,2,4,2,4,2,4,1 };
void setup() {

//run SOS 3 times
  for (int runSOS = 0; runSOS < 3; runSOS++) {

// SOS
  for (int thisTone = 0; thisTone < 10; thisTone++) {

// to calculate the tone duration, take one second, divided by note type
    int toneDuration = 1000/toneDurations[thisTone];
// call tone
    tone(8,SOS[thisTone],toneDuration);
// silence to distinguish between notes
    int pauseBetweenTones = toneDuration*2;
    delay(pauseBetweenTones);
  }
  }

// begin cardiac beep
  for (int thisCardiacBeep = 0; thisCardiacBeep < 5; thisCardiacBeep++) {

    int cardiacBeepDuration = 1000/cardiacBeepDurations[thisCardiacBeep];
    tone(8,cardiacBeep[thisCardiacBeep],cardiacBeepDuration);
    int pauseBetweenBeeps = cardiacBeepDuration*5.3;
    delay(pauseBetweenBeeps);
  }
// cardiac arrest
    tone(8,NOTE_A4,5000);

// pause before funeral march
  delay(6000);

// begin Funeral March
  for (int thisNote = 0; thisNote < 11; thisNote++) {
    int noteDuration = 1000/noteDurations[thisNote];
    tone(8,melody[thisNote],noteDuration);
    int pauseBetweenNotes = noteDuration*1.1;
    delay(pauseBetweenNotes);
  }
}
void loop() {
  // no need to repeat the melody.
}
Include this on a second tab within the Arduino sketch:
#define NOTE_0  0
#define NOTE_B0  31
#define NOTE_C1  33
#define NOTE_CS1 35
#define NOTE_D1  37
#define NOTE_DS1 39
#define NOTE_E1  41
#define NOTE_F1  44
#define NOTE_FS1 46
#define NOTE_G1  49
#define NOTE_GS1 52
#define NOTE_A1  55
#define NOTE_AS1 58
#define NOTE_B1  62
#define NOTE_C2  65
#define NOTE_CS2 69
#define NOTE_D2  73
#define NOTE_DS2 78
#define NOTE_E2  82
#define NOTE_F2  87
#define NOTE_FS2 93
#define NOTE_G2  98
#define NOTE_GS2 104
#define NOTE_A2  110
#define NOTE_AS2 117
#define NOTE_B2  123
#define NOTE_C3  131
#define NOTE_CS3 139
#define NOTE_D3  147
#define NOTE_DS3 156
#define NOTE_E3  165
#define NOTE_F3  175
#define NOTE_FS3 185
#define NOTE_G3  196
#define NOTE_GS3 208
#define NOTE_A3  220
#define NOTE_AS3 233
#define NOTE_B3  247
#define NOTE_C4  262
#define NOTE_CS4 277
#define NOTE_D4  294
#define NOTE_DS4 311
#define NOTE_E4  330
#define NOTE_F4  349
#define NOTE_FS4 370
#define NOTE_G4  392
#define NOTE_GS4 415
#define NOTE_A4  440
#define NOTE_AS4 466
#define NOTE_B4  494
#define NOTE_C5  523
#define NOTE_CS5 554
#define NOTE_D5  587
#define NOTE_DS5 622
#define NOTE_E5  659
#define NOTE_F5  698
#define NOTE_FS5 740
#define NOTE_G5  784
#define NOTE_GS5 831
#define NOTE_A5  880
#define NOTE_AS5 932
#define NOTE_B5  988
#define NOTE_C6  1047
#define NOTE_CS6 1109
#define NOTE_D6  1175
#define NOTE_DS6 1245
#define NOTE_E6  1319
#define NOTE_F6  1397
#define NOTE_FS6 1480
#define NOTE_G6  1568
#define NOTE_GS6 1661
#define NOTE_A6  1760
#define NOTE_AS6 1865
#define NOTE_B6  1976
#define NOTE_C7  2093
#define NOTE_CS7 2217
#define NOTE_D7  2349
#define NOTE_DS7 2489
#define NOTE_E7  2637
#define NOTE_F7  2794
#define NOTE_FS7 2960
#define NOTE_G7  3136
#define NOTE_GS7 3322
#define NOTE_A7  3520
#define NOTE_AS7 3729
#define NOTE_B7  3951
#define NOTE_C8  4186
#define NOTE_CS8 4435
#define NOTE_D8  4699
#define NOTE_DS8 4978
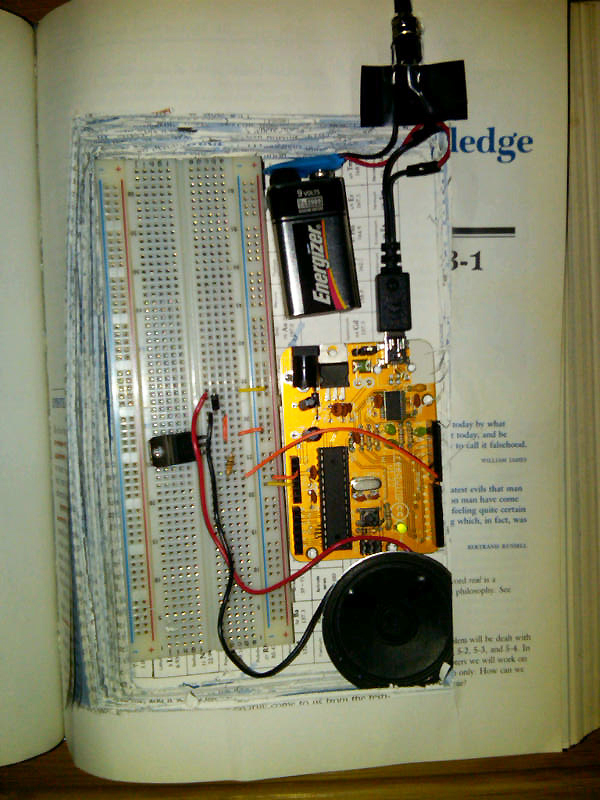
When I first wired the speaker up with the Arduino and the breadboard, the signal was very weak and produced a very quiet tone. I decided to add the TIP120 and the diode to increase the volume of the signal. I wanted to make the piece self-contained and not require a laptop for power, so I powered the Arduino with a 9V battery. In doing so, I discovered that my DC in on my Arduino didn't work, so I clipped a micro USB plug from and old cell phone charger and soldered it to the wires from the battery. I then cut out a section of a textbook to house the electronics. Finally, I added a push-to-break switch so that the program could be triggered without having to open the book. The switch shuts the Arduino off momentarily, causing it to restart the program.
